I have been searching ALL over
Google for an easy enough way to make a button for my blog, not sure if I'm just "dumb" or what, but all the instructions I found confused me when they said to save your picture to the server and used all these weird words to tell which server they use etc. etc.
SO finally after HOURS of trying to figure out a code to work on my blog for my button to show up, I figured it out - I got SO annoyed at one point I almost gave up, lol...
I decided to try and get some instructions made up and make a step-by-step tutorial for anyone that comes across this blog post, and hopefully it will help people like me, that get confused by some wording others use :)
So here goes....
BLOG BUTTON BASICS
The standard blog button is apparently 125px by 125px. I found that to be pretty small for me, but you can choose a size larger
than this, some say not to go larger than 150 pixels wide, but I found 170 pixels wide to be perfect for mine and what I wanted mine to look like. Most sidebars are
only 200 pixels wide, so if you use a larger blog button, the sides of
your button will be cut off - and we don't want that. So for this tutorial of mine, I am going to be using : 170 x 170 pixels.
Step 1 : Design, Re-size and Create your Image You Want to Use on PAINT
First off to design and make your blog button, you will need access to an
image editing software – an example would be
Photoshop. You unfortunately have to pay for
Photoshop, and I'm sure if you are a beginner to blogging you won't want to spend a lot of money to edit a picture. Doesn't mean you can't get
Photoshop if you want to, by all means get it if that is what you would like to use :) There are quite a few free
image editing software programs available though, so use
Google to search for some.
I, however, would recommend using Paint and
Photobucket - both are free (bonus!) and I find it pretty easy for anyone to use, and paint comes with your computer programs anyways....
I started by using PAINT, to resize my picture and edit it with text etc. (you can edit with whatever you would like to have on your Image).
Secondly your picture HAS TO BE SQUARE!!
See pictures and steps for the Design and Re-size steps in PAINT below (click on the pictures to make them bigger) :
Open your chosen picture in PAINT and add text etc to you picture.
Save your picture onto your Desktop (I just find this easier when I am editing pictures and need to get to them quickly)
1. At the bottom it will show you what size your picture is originally
2. Click on "Re-size"
3. A new screen will pop up
4. Choose the "Pixels" ("Percentage" should now NOT be chosen"
5. There are two numbers that are the same as number 1 in the picture - these are going to be
changed
6. Change the numbers to 170 (or whatever number makes your picture suitable for you). And
click "Ok"
7. At the bottom it will show you the new size of your picture.
File > Save as
8. Your picture is now smaller and ready for you to move onto the next step :
PHOTOBUCKET
Step 2 :Upload and Get Code on PHOTOBUCKET
This next step will get you your Button Code you will need to make your button appear on your blog :)
If you haven't used
Photobucket before, it is really easy to download, and like I mentioned before, it is FREE! In order to do this step you will need to sign up. Once you have done that, upload your picture you just edited in PAINT.
See pictures and steps for the
Upload and Get Code on PHOTOBUCKET below (click on the pictures to make them bigger) :
1. Click on "Upload" and upload your picture you just edited etc. on PAINT.
2. Click on the "Album" tab
3. Your picture you just uploaded should show up and look like my image in picture above
Move your mouse onto your picture
You will see a white box will show up around your picture with 4 codes below it in boxed areas
4. Click on the code in the box next to the "IMG Code" words. Once you click on it, the word
"Copied" will quickly show up, so you don't need to right click and click paste like we normally
do any copy and paste things
In my image above, I "zoomed" the code in for you, this is what the code should look like once copied :
[IMG]http://i1254.photobucket.com/albums/hh610/YourProfileName/PicName.jpg[/IMG]
5. "
YourProfileName" should show up here. So if you make your account sign in name
"
Jaded" the text in that area will be "
Jaded" instead of "
YourProfileName".
6. "
PicName" should show up here. However you have saved your picture, that name will show
up there, so if you have saved your picture on your computer as "
Blog Button", the text in
that area will be "
BlogButton" instead of "
PicName".
ALSO MAKE SURE TO DELETE
THE [IMG]and[/IMG] WORDS ON EITHER SIDE OF THE CODE
SO, your code will change from...
This :
[IMG]http://i1254.photobucket.com/albums/hh610/YourProfileName/PicName.jpg[/IMG]
To this :
http://i1254.photobucket.com/albums/hh610/Jaded/BlogButton.jpg
Get it?? :)) - I hope so!
GETTING BACK TO THE BLOG BUTTON INSTRUCTIONS :
Now once you have copied the code on your
PHOTOBUCKET picture, do yourself a favor and paste it onto a Word document, just so it is easy for you to work on the actual code you will now have to use to make your code to use on your blog.
Step 3 : Choosing Your Code and Look of Your Button You Want on Your Blog
There are TWO different looks for buttons. One is just your image and the other your image AND the grab box for others to use, by copying and pasting the code belowonto their blogs. The most common one is the image and grab box, so that others can "advertise" their friends blogs on their own blogs.
Below I have the two different codes you can use, depending on the type of button you want...
1. Just the Image Code
<a href= “http://www.YourSiteURL.com”><imgsrc=“http://www.YourButtonImageURL.jpg” /></a>
Copy the above code and paste it into your open Word document (remember to press enter a few times, you don't want your picture code and the above code to be joined together).
Now that you have the above code in your open Word document, you are going to first edit it and then use your picture code by copying and pasting it into the above code.
“http://www.YourSiteURL.com” - where it says "yoursiteurl", change that to your BLOG address. For example I will use my blog address : southafricangirlinamerica.blogspot.com.
“http://www.YourButtonImageURL.jpg” - where it says "yourbuttonimageurl", change that by copying and pasting your photobucket IMG code. For example http://i1254.photobucket.com/albums/hh610/Jaded/BlogButton.jpg
So the code for just the image will change from....
This :
<a href= “http://www.YourSiteURL.com”><imgsrc=“http://www.YourButtonImageURL.jpg” /></a>
to this :
<a href= “http://www.southafricangirlinamerica.blogspot.com”><imgsrc=“http://i1254.photobucket.com/albums/hh610/Jaded/BlogButton.jpg” /></a>
KEEP THE " " DO NOT DELETE THESE!!
You would now use the edited code (eg. one in blue) to past it onto your blog. Go to your blog, go to "Layout", and click on "Add a Gadget" and choose the "HTML / Java Script" Gadget. A new screen will pop up, copy and paste your edited code in there and click save!!
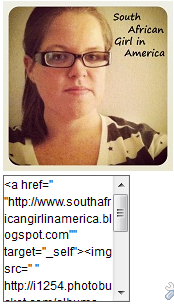
Your button should look like this :
2. Both the Image AND Grab Box Code
<img src=“http://www.YourButtonImageURL” alt=”YourSiteTitle” /><div style=”width: 125px; height: 125px; overflow: auto; border: 1px solid #666666;”><a href="http://www.YourSiteURL.com" target="_self"><img src="http://www.YourButtonImageURL" alt="YourSiteTitle" width="125" height="125" /></a></div>
Copy the above code and paste it into
your open Word document (remember to press enter a few times, you don't
want your picture code and the above code to be joined together).
Now
that you have the above code in your open Word document, you are going
to first edit it and then use your picture code by copying and pasting
it into the above code. There are few more things to change on this code too, but see all the blue changes. It should make sense if you read through number 1 :))
Once all your editing of this second code choice is done, the code will change from....
this :
<img src=“http://www.YourButtonImageURL” alt=”YourSiteTitle” /><div style=”width: 125px; height: 125px; overflow: auto; border: 1px solid #666666;”><a href=""http://www.YourSiteURL.com"" target="_self"><img src=""http://www.YourButtonImageURL"" alt=""YourSiteTitle"" width="125" height="125" /></a></div>
to this :
<img src=“http://i1254.photobucket.com/albums/hh610/Jaded/BlogButton.jpg” alt=”southAfricanGirlInAmerica” /><div style=”width: 125px; height: 125px; overflow: auto; border: 1px solid #666666;”><a href=""http://www.southafricangirlinamerica.blogspot.com"" target="_self"><img src="“http://i1254.photobucket.com/albums/hh610/Jaded/BlogButton.jpg”" alt=""SouthAfricanGirlInAmerica"" width="125" height="125" /></a></div>
"YourSiteTitle" has been added to this code to change, this is the title of you blog, eg. my blogs name is South African Girl in America, so I replaced
"YourSiteTitle" to
"SouthAfricanGirlInAmerica"
KEEP THE " " DO NOT DELETE THESE!!
You
would now use the edited code (eg. one in blue) to past it onto your
blog. Go to your blog, go to "Layout", and click on "Add a Gadget" and
choose the "HTML / Java Script" Gadget. A new screen will pop up, copy
and paste your edited code in there and click save!!
Your button should look like this :
Good luck!! I hope this helped you out - if not, please comment on this and ask anything you need.


.JPG)


